GitHub Blog [4]: Search Console, Analytics, Adsense
Prerequisites
[1] Github Blog [1]: Using Jekyll
[2] GitHub Blog [2]: Customizing
[3] GitHub Blog [3]: A comments system, giscus
Google Search Console
A device that allows your blog posts to appear when searched on Google

1. How to set your site searchable?
Step 0. Please make Google Account first!
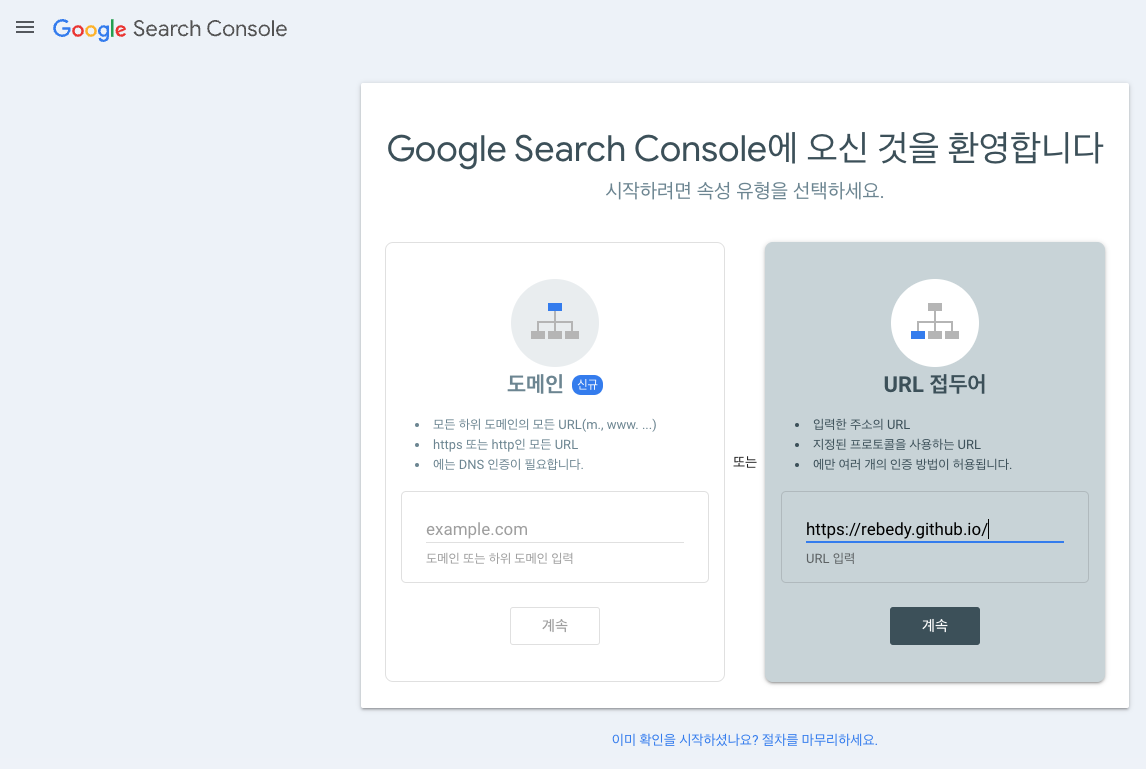
Step 1. Add your site
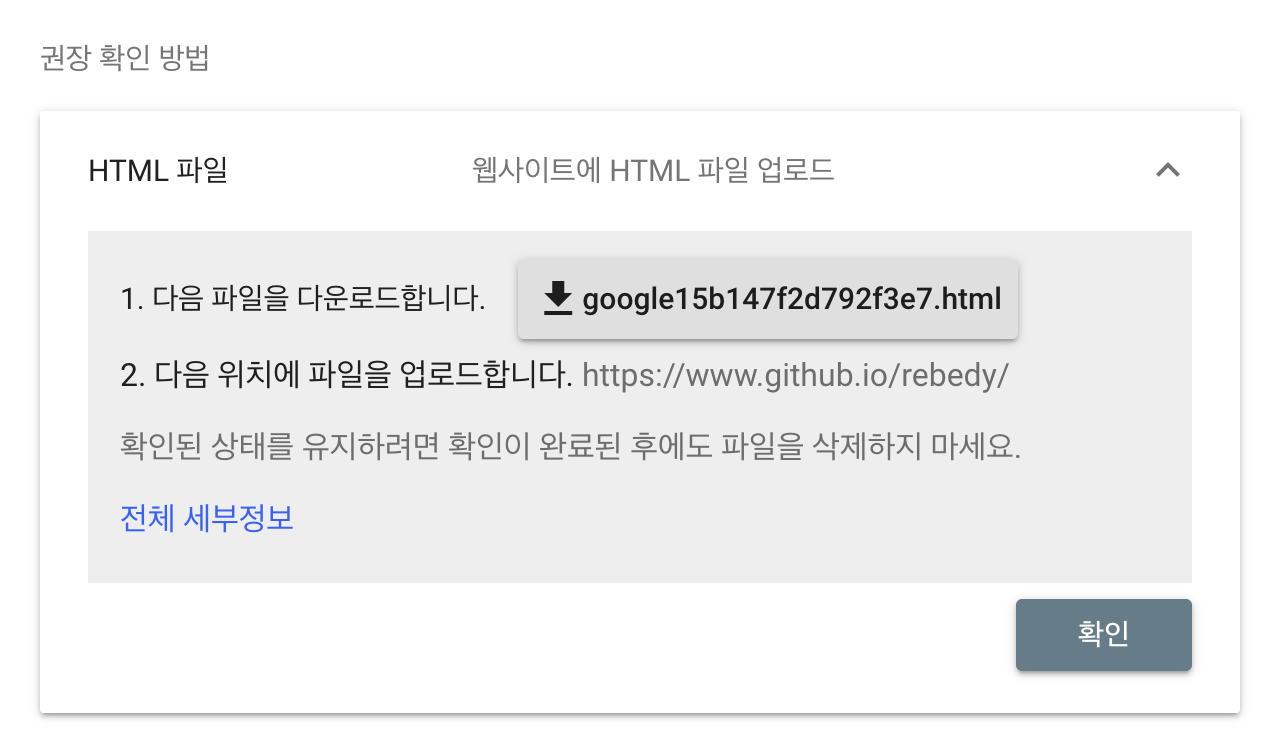
Step 2. Download HTML file
Download the HTML file and place it in where the Gemfile is. And commit and push the repo.
Step 3. Edit Gemfile
Add the code line below at the very last in the Gemfile
1
gem 'jekyll-sitemap'
And run the command below.
1
bundle install
Step 4. sitemap.xml
Run local server and then go to http://localhost:4000/sitemap.xml.
1
 jekyll serve
You will see a page written in XML. Copy it and make a sitemap.xml in where the Gemfile is.
…
OR
…
you also can just copy the XML code below to the sitemap.xml . Oh but you need to change the blog address part.
1
2
3
4
5
6
7
8
9
10
11
12
13
14
15
16
17
18
19
20
21
22
23
24
25
26
27
28
29
30
31
32
33
34
35
36
37
38
---
layout: null
---
<?xml version="1.0" encoding="UTF-8"?>
<urlset xmlns:xsi="http://www.w3.org/2001/XMLSchema-instance" xsi:schemaLocation="http://www.sitemaps.org/schemas/sitemap/0.9 http://www.sitemaps.org/schemas/sitemap/0.9/sitemap.xsd" xmlns="http://www.sitemaps.org/schemas/sitemap/0.9">
<url>
  <loc>https://rebedy.github.io/</loc>
  <lastmod>2024-05-29T08:34:20+00:00</lastmod>
  <priority>1.00</priority>
</url>
<url>
  <loc>https://rebedy.github.io/about/</loc>
  <lastmod>2024-05-29T08:34:20+00:00</lastmod>
  <priority>0.80</priority>
</url>
  {% for post in site.posts %}
    <url>
      <loc>{{ site.url }}{{ post.url }}</loc>
      {% if post.last_modified_at == null %}
        <lastmod>{{ post.date | date_to_xmlschema }}</lastmod>
      {% else %}
        <lastmod>{{ post.last_modified_at | date_to_xmlschema }}</lastmod>
      {% endif %}

      {% if post.sitemap.changefreq == null %}
        <changefreq>weekly</changefreq>
      {% else %}
        <changefreq>{{ post.sitemap.changefreq }}</changefreq>
      {% endif %}

      {% if post.sitemap.priority == null %}
        <priority>0.5</priority>
      {% else %}
        <priority>{{ post.sitemap.priority }}</priority>
      {% endif %}
    </url>
  {% endfor %}
</urlset>
…
OR
…
you also can visit sites generate sitemap.xml for you!
Step 5. robots.txt
Copy the code below and make a robots.txt file where the Gemfile and the sitemap.xml is.
1
2
3
4
User-agent: *
Allow: /

Sitemap: https://rebedy.github.io/sitemap.xml
Of course you gotta change the blog address!
And commit/push!
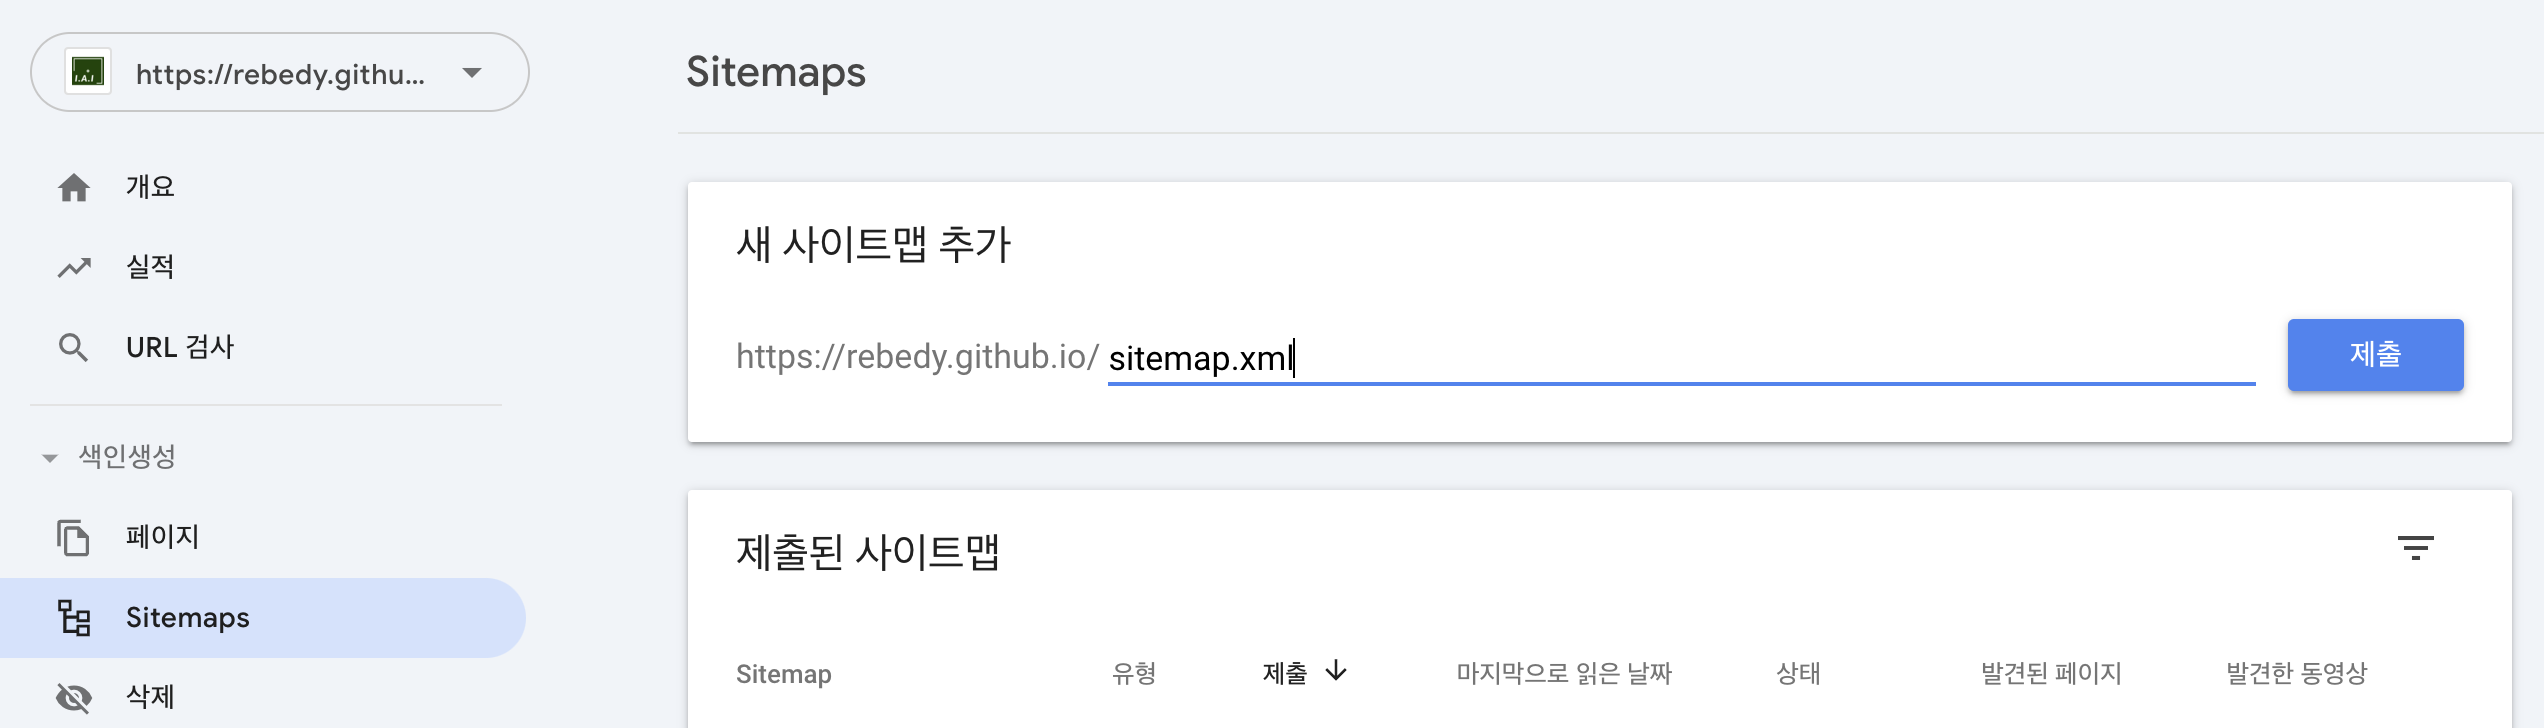
Step 6. Add new Sitemaps on the Google Search Console
Within 7 days, your blog will be exposed on the search engine.
❗🚧 Do this step and the steps below time to time in order to add new posts to sitemaps and make them indexed!!! 🚧❗
2. ⚠️ If your site is not searchable even after 7 days…
Step 1. Check your pages
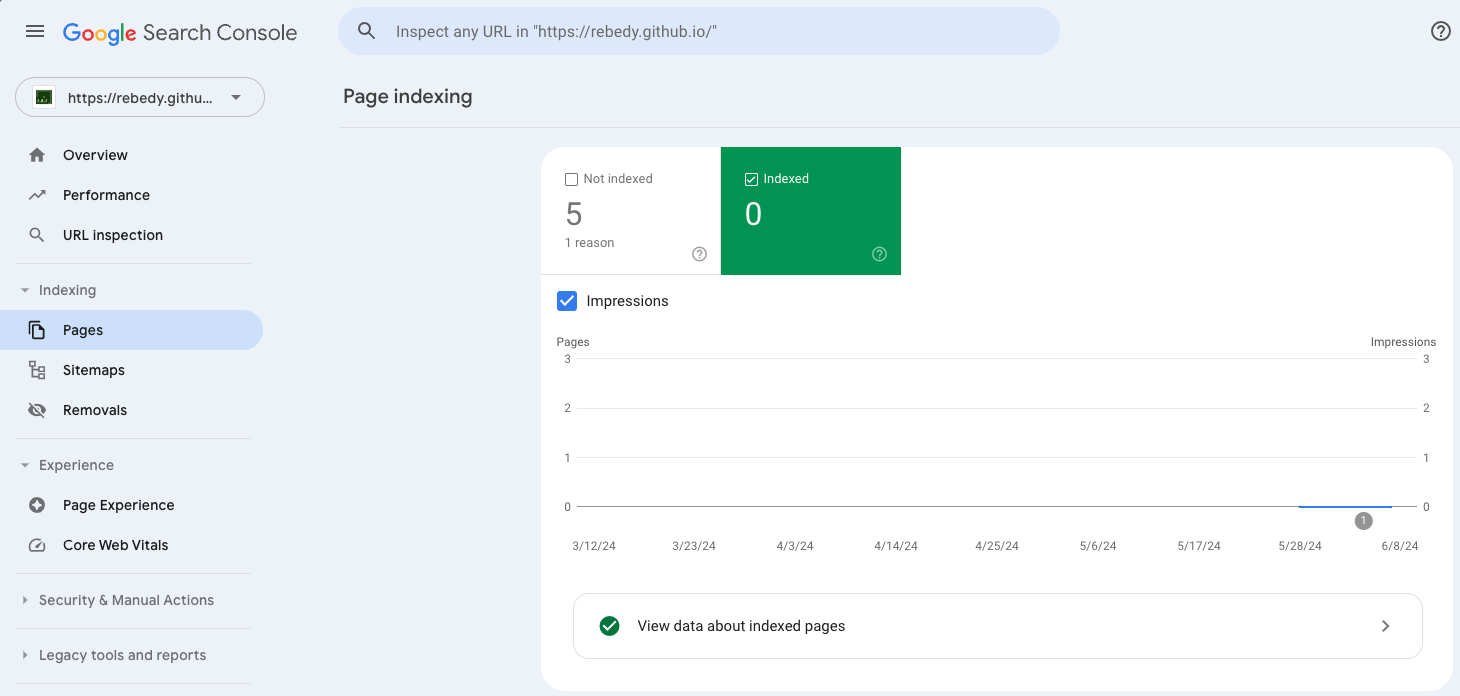
There is ZERO indexed pages…😲
An index must be created to actually be searchable on Google, but this does not happen just by registering a sitemap, and you may have to do it yourself. So, I chose to manually put each of my post addresses in the index registration priority list.
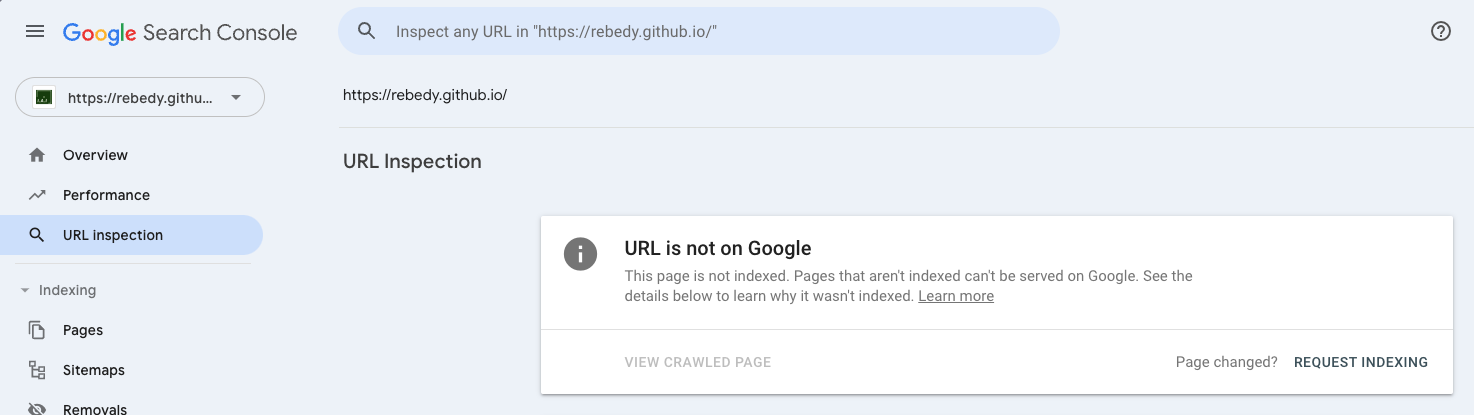
Step 2. URL Inspection

Searcg your blog URL on inspection bar.
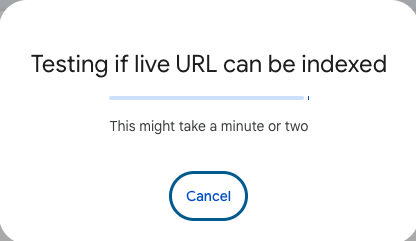
Step 3. Let’s request indexing…
Since the URl is not on Google, I requested indexing.
It will say that the request has been made after few mins. And the page will become searchable on Google in a day or two. If you wait, the index for the requested sites will be approved one by one. If approved, you can search on Google.
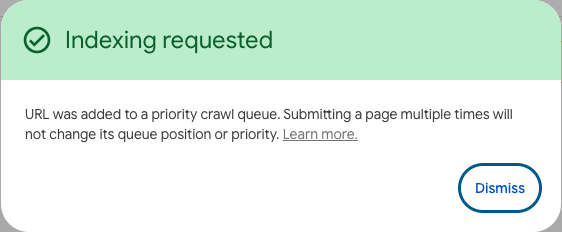
❗If you see the quota exceeded message, try again a day later.
Google Analytics
It is a tool that analyzes various factors such as who accessed my blog, when, where, and how much.

Step 1. Start
Press ‘start’ button and make a name for the account. And then leave other things as default.
Since the Google Analytics upgraded their service from Universal Analytics to GA4, things are much simple and easier.

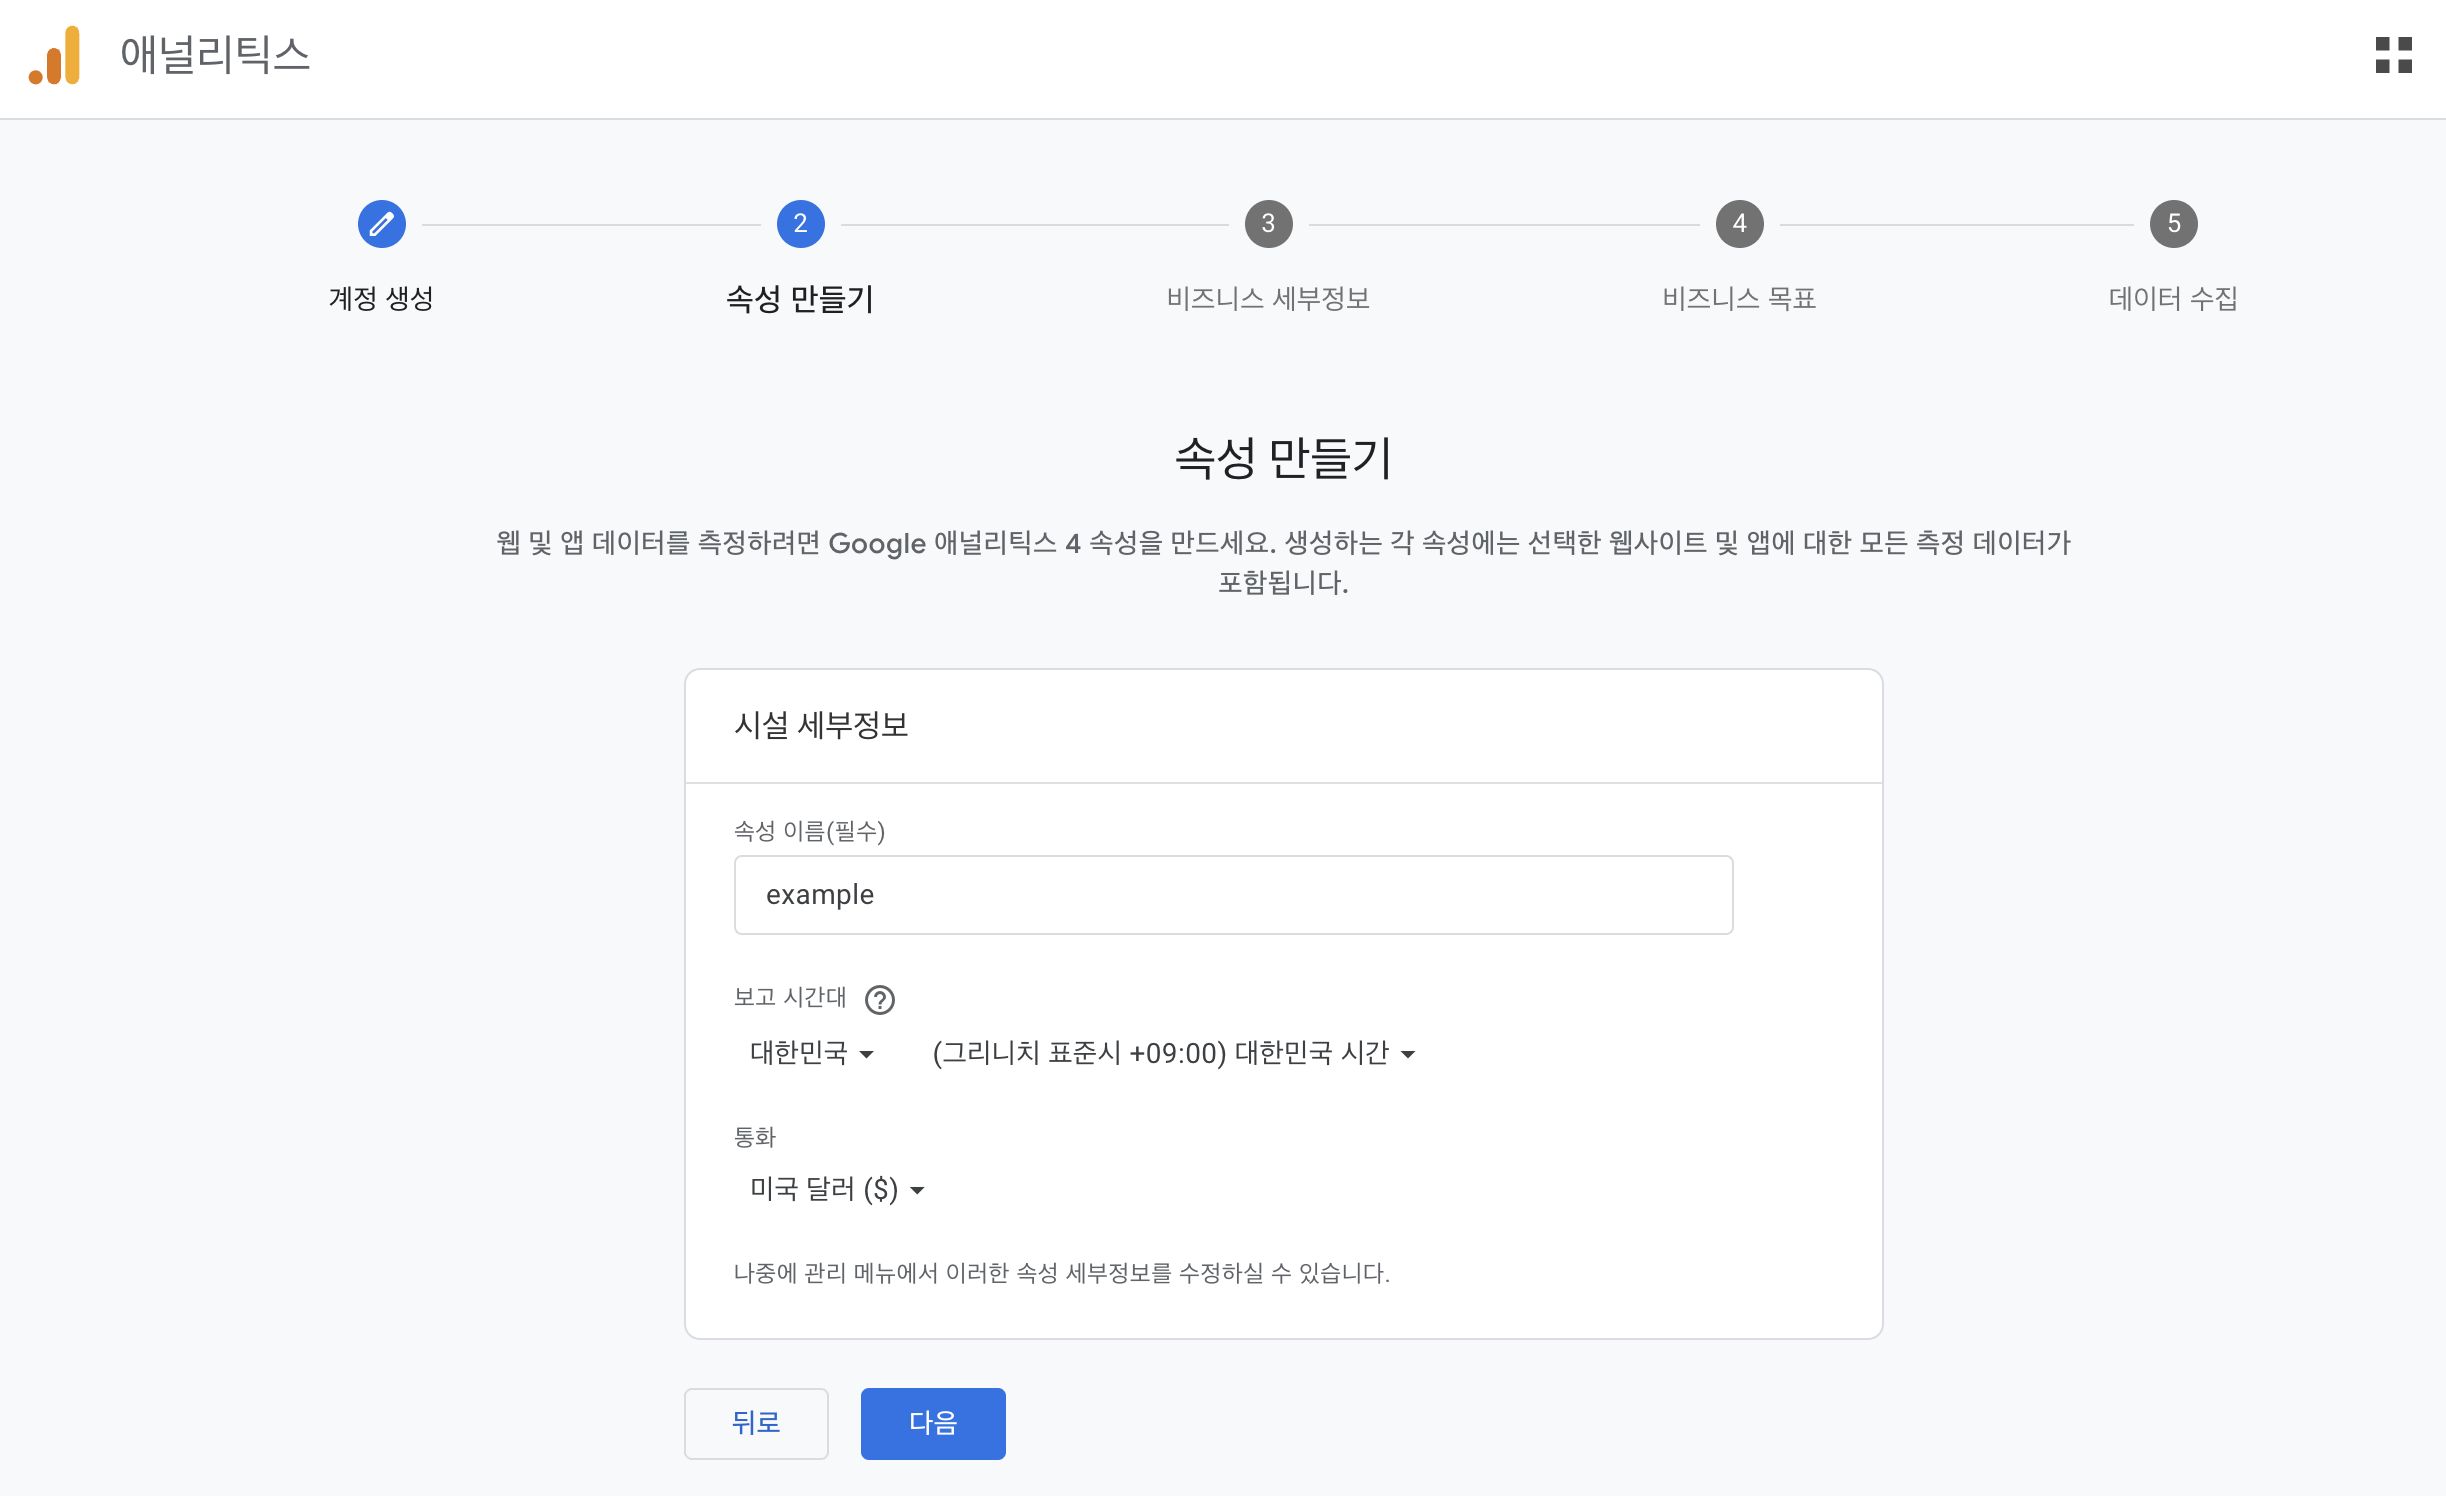
Step 2. Make new attribute
- (Mandatory) Attribute name: yours
- Time for the analytics: Kor
- Currency: $ (can be anything)
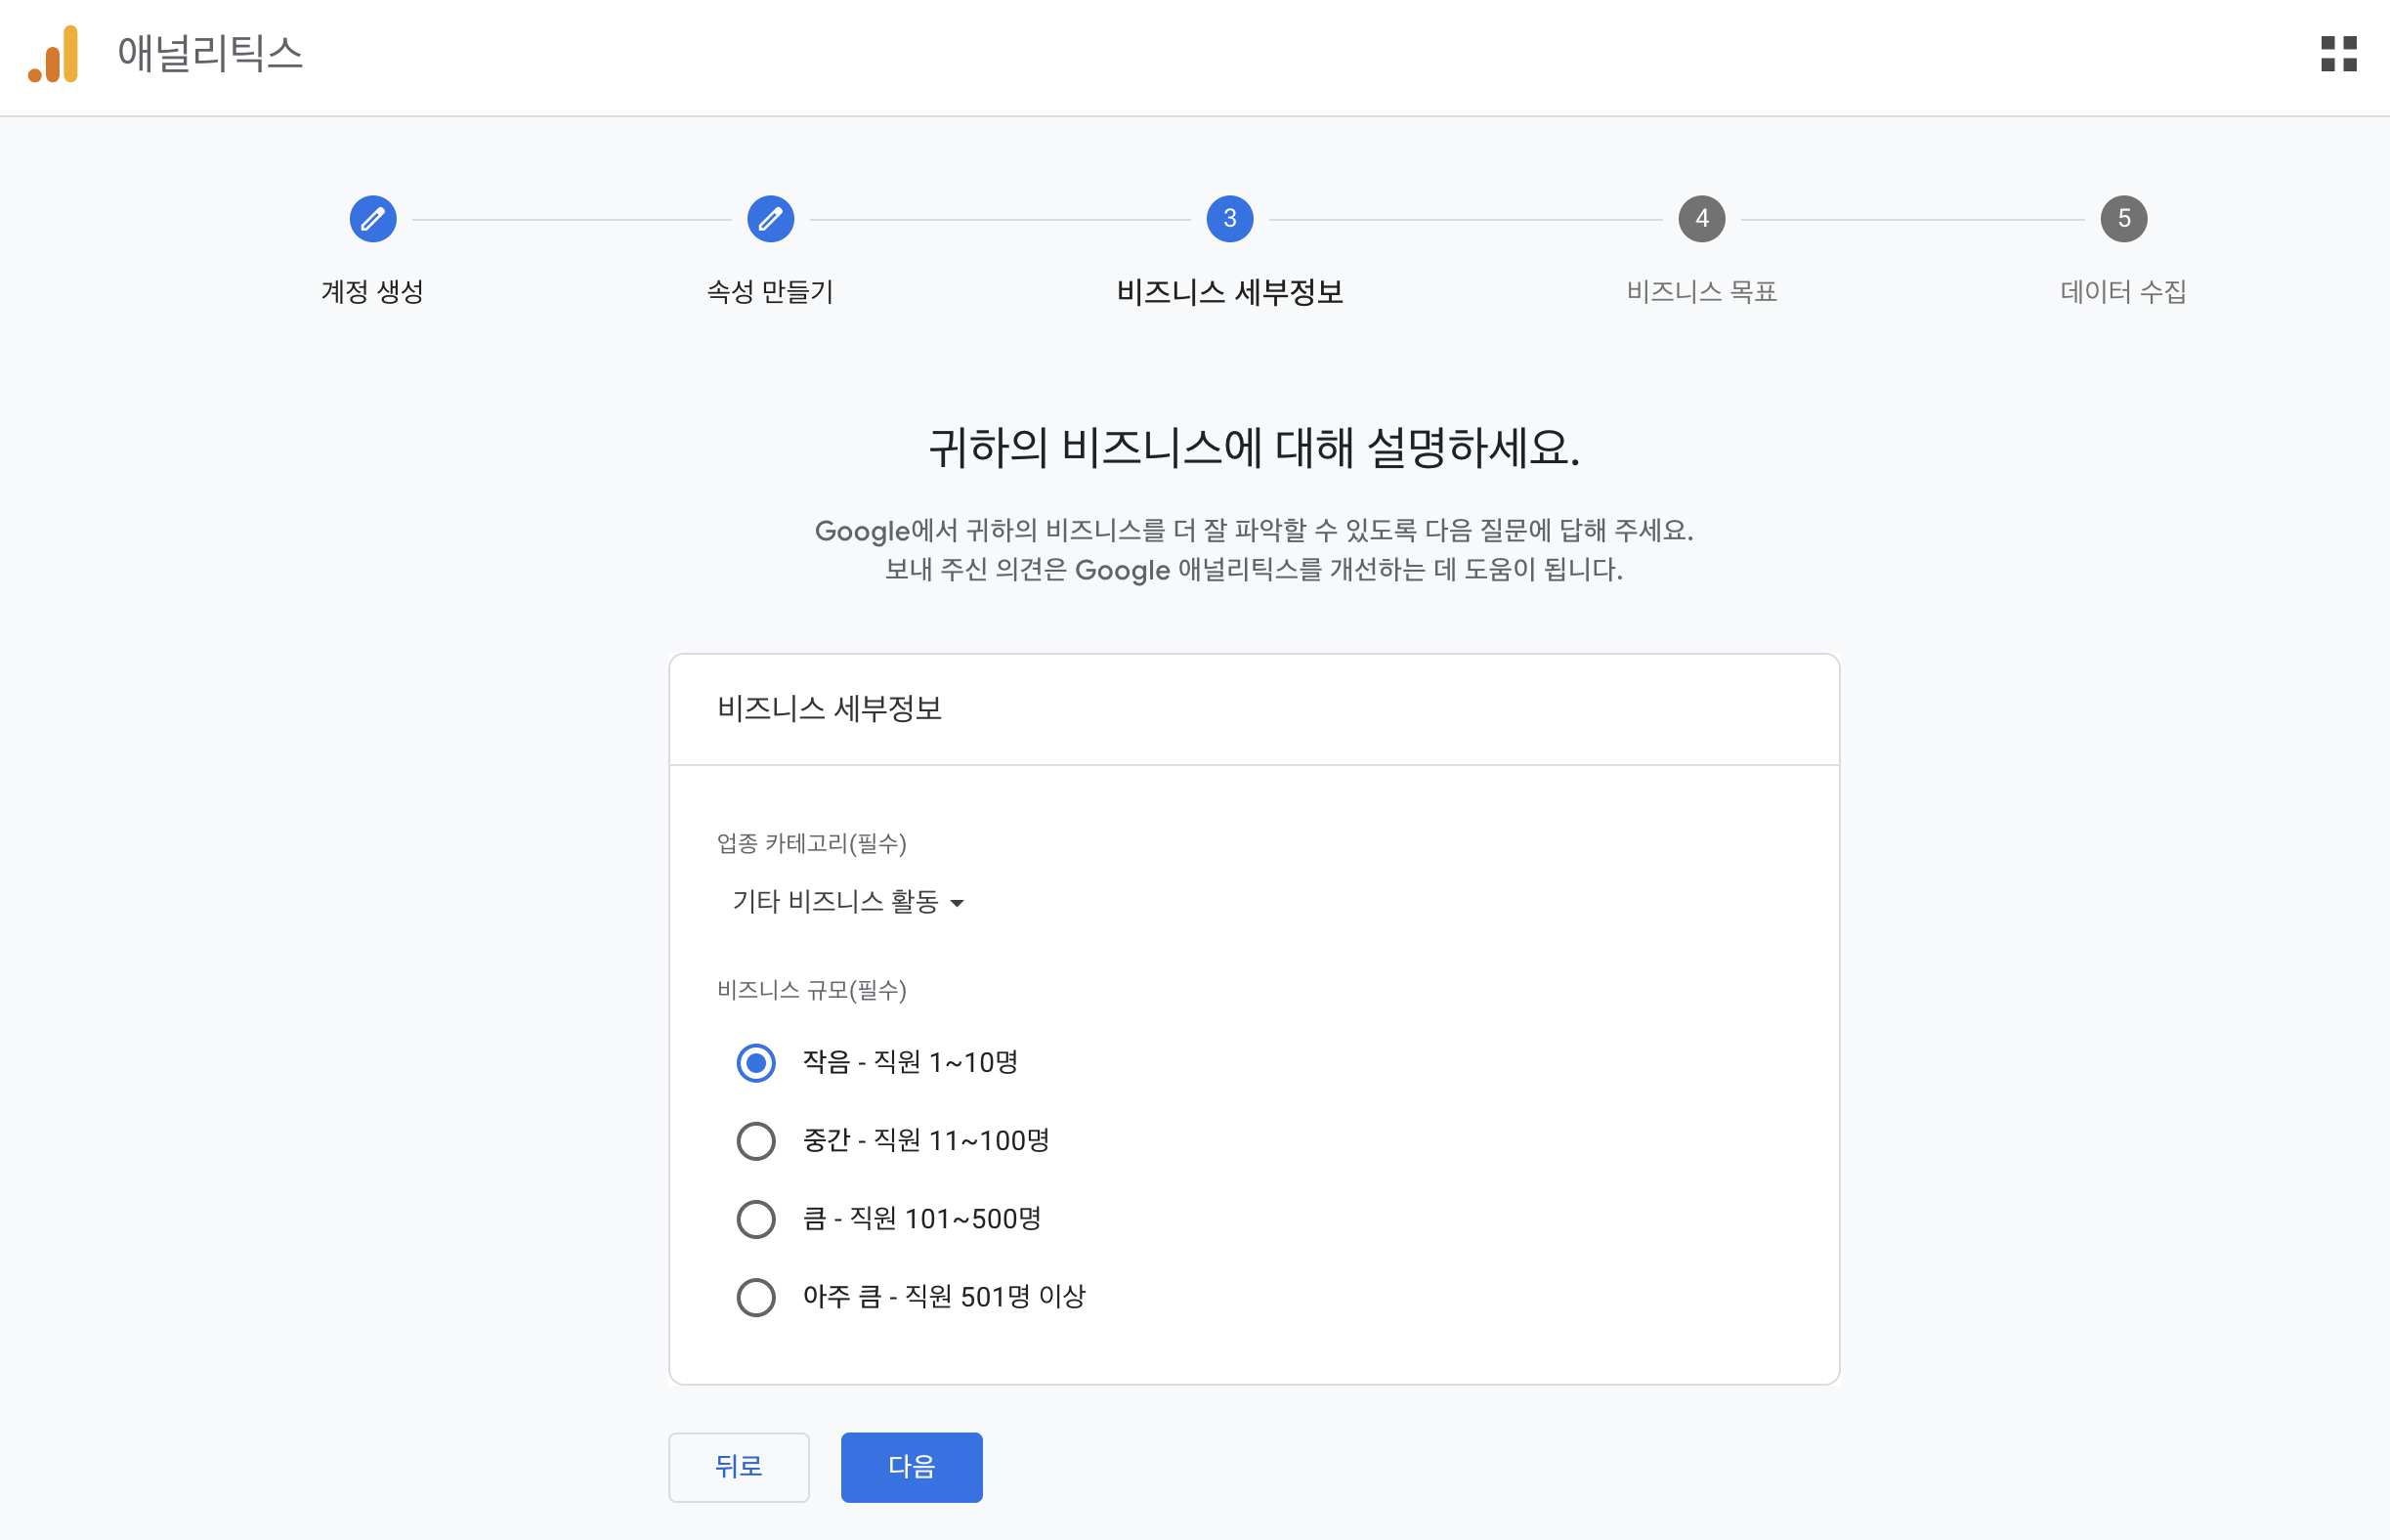
Step 3. Details for your Analytics
Since this is just for your blog (not some kind of serious business😂), the size of the business will be the smallest one and the category of the business will be etc.
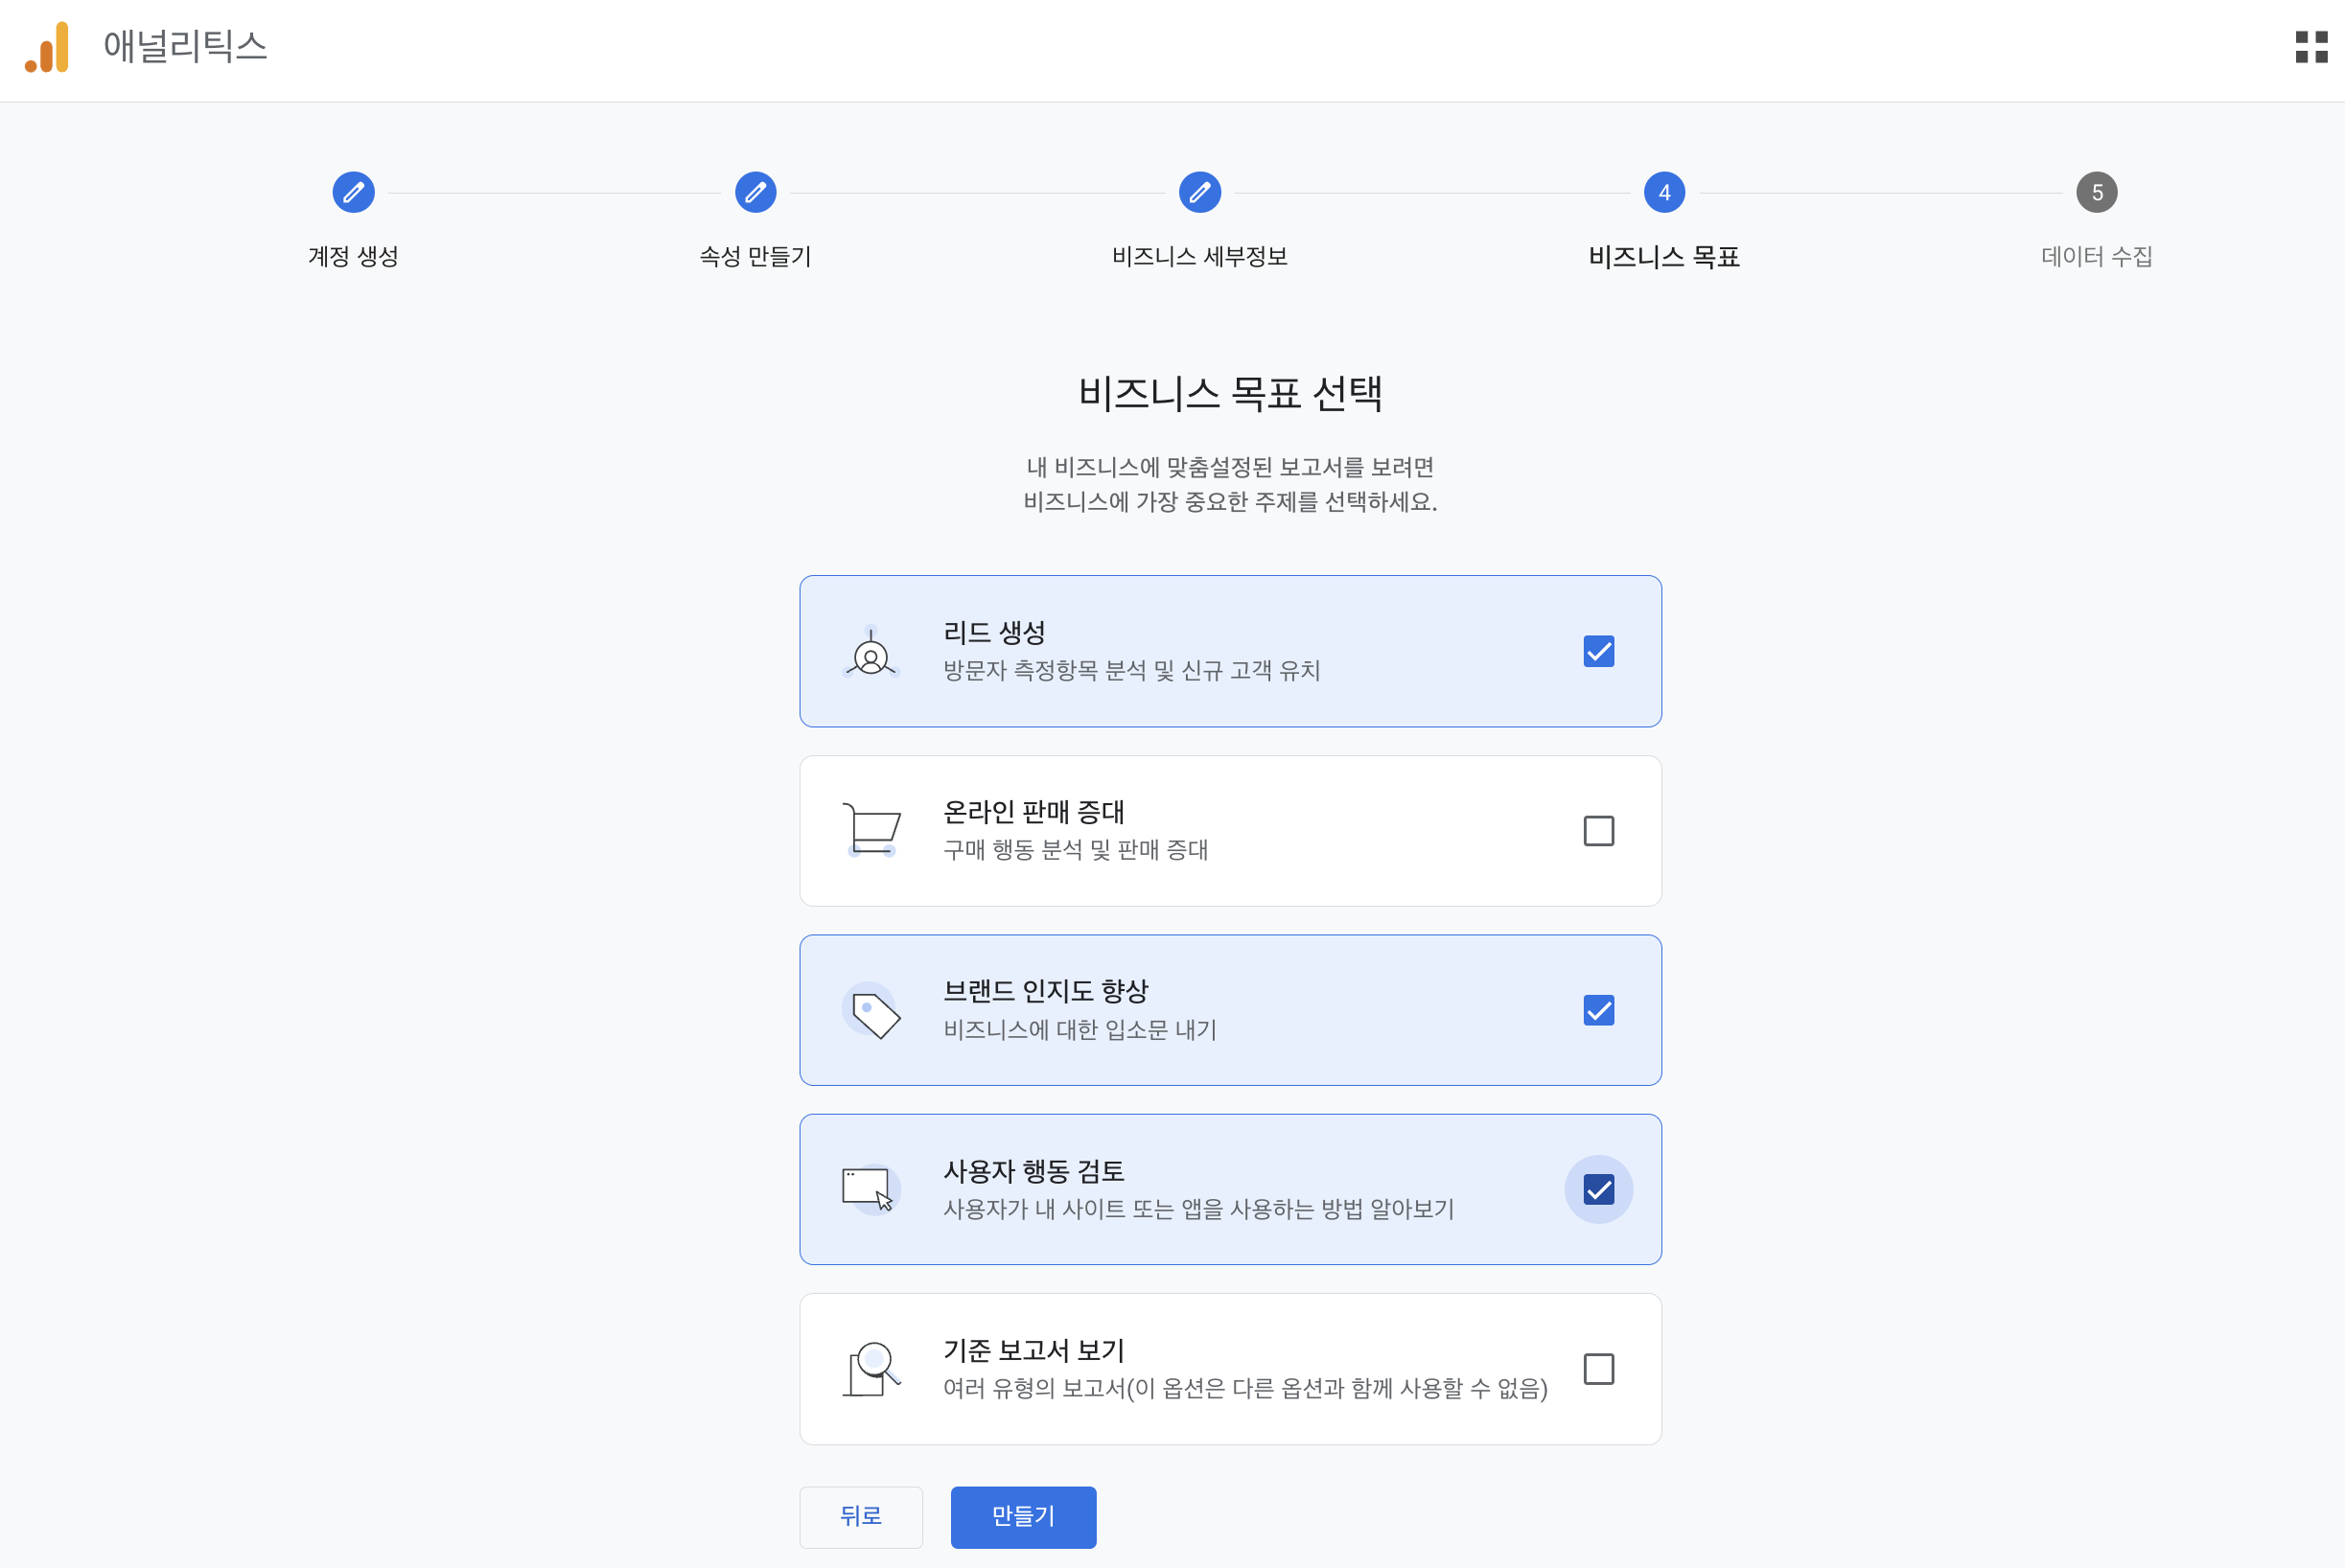
Same with ‘the purpose of business’. Choose anything you like for the 4th step.
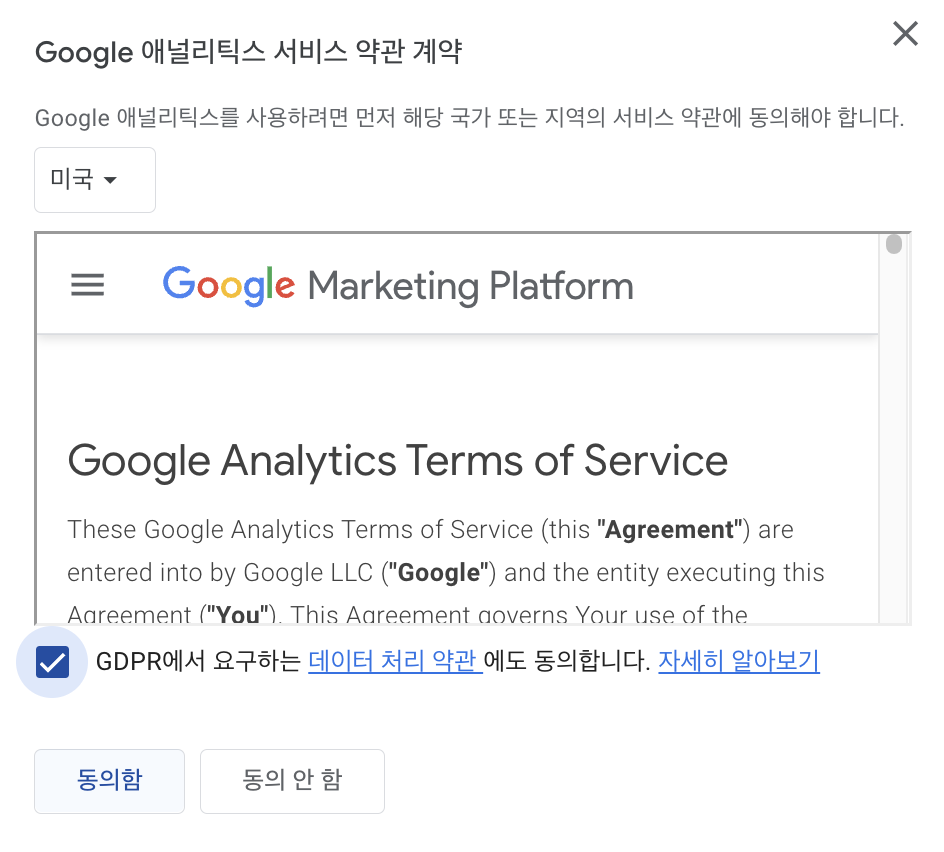
And agree to the GDR.
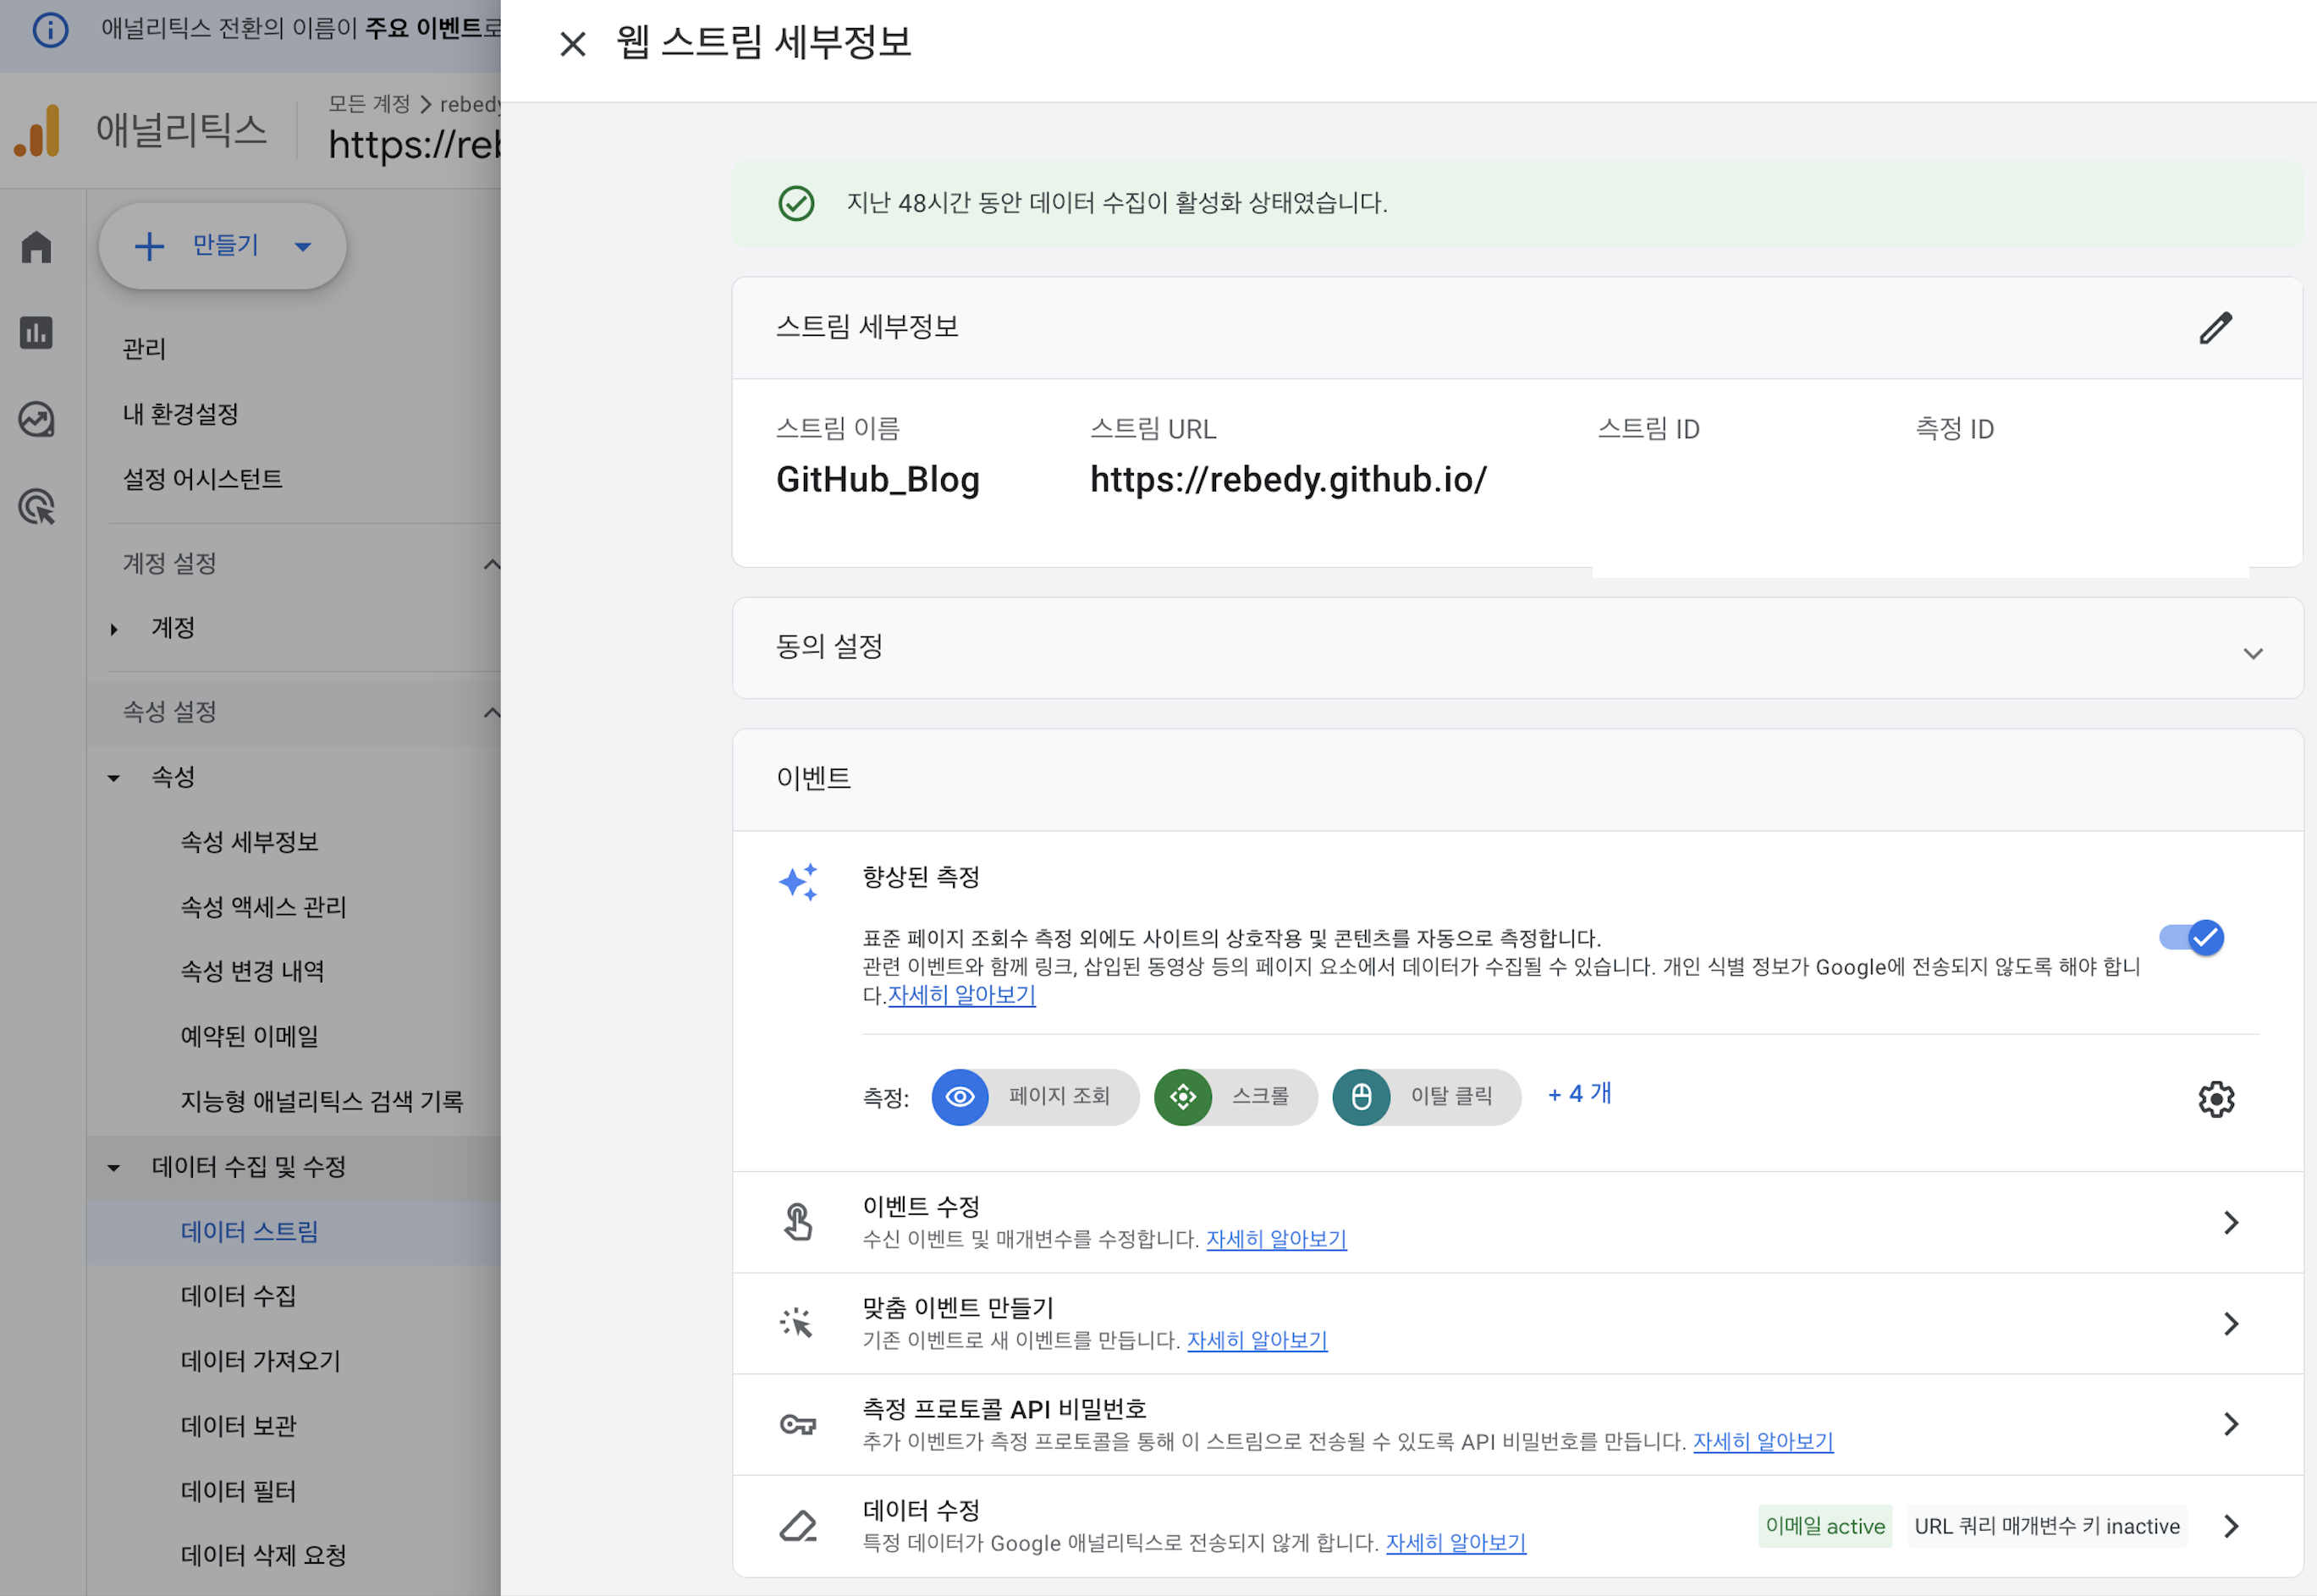
Step 4. Measurement ID to _config.yml
- How to get there?
‘Manage’ > ‘Attribute Setting’ > ‘Data Collection and Edit’ > ‘Data Stream’ > Choose your stream > ‘Stream Details’ > ‘Measurement ID’
_config.yml
1
2
3
4
# Web Analytics Settings
analytics:
  google:
    id: G-xxxxxxxxxx # fill in your Google Analytics ID
Again, since the Google Analytics upgraded their service from Universal Analytics to GA4, your measurement ID is also starts with G not UA.
Google Adsense
A tool that generates revenue through advertising and allows you to earn advertising fees.

Step 1. Sign up
After accessing the site and sign up using your blog’s URL and email address and so on. The region should be where you live and agree to the terms and conditions.
Register a profile in order to receive payments. Enter personal information such as address and contact information.
Step 2. Apply Google AdSense code to website
Add code below to the bottom of _includes/head.html.
1
2
3
4
5
6
<!--...-->

  <!-- Google Addsence -->
  <script data-ad-client="ca-pub-xxxxxxxxxxxxxxxx" async src="https://pagead2.googlesyndication.com/pagead/js/adsbygoogle.js"></script>

</head>
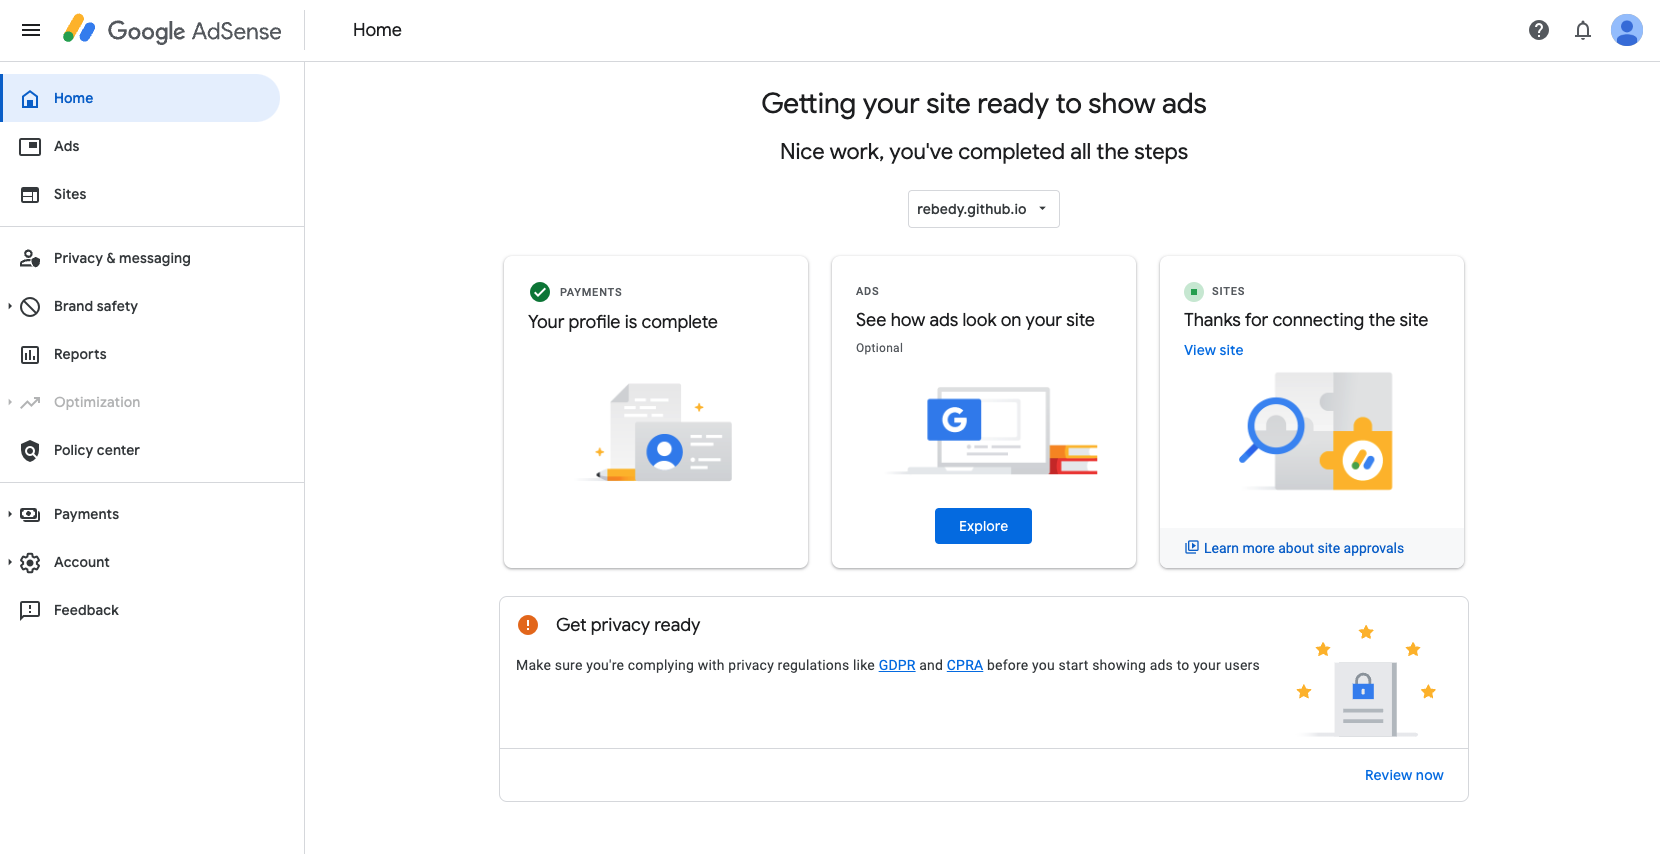
Step 3. Add site
Go to Sites tab and add your site.
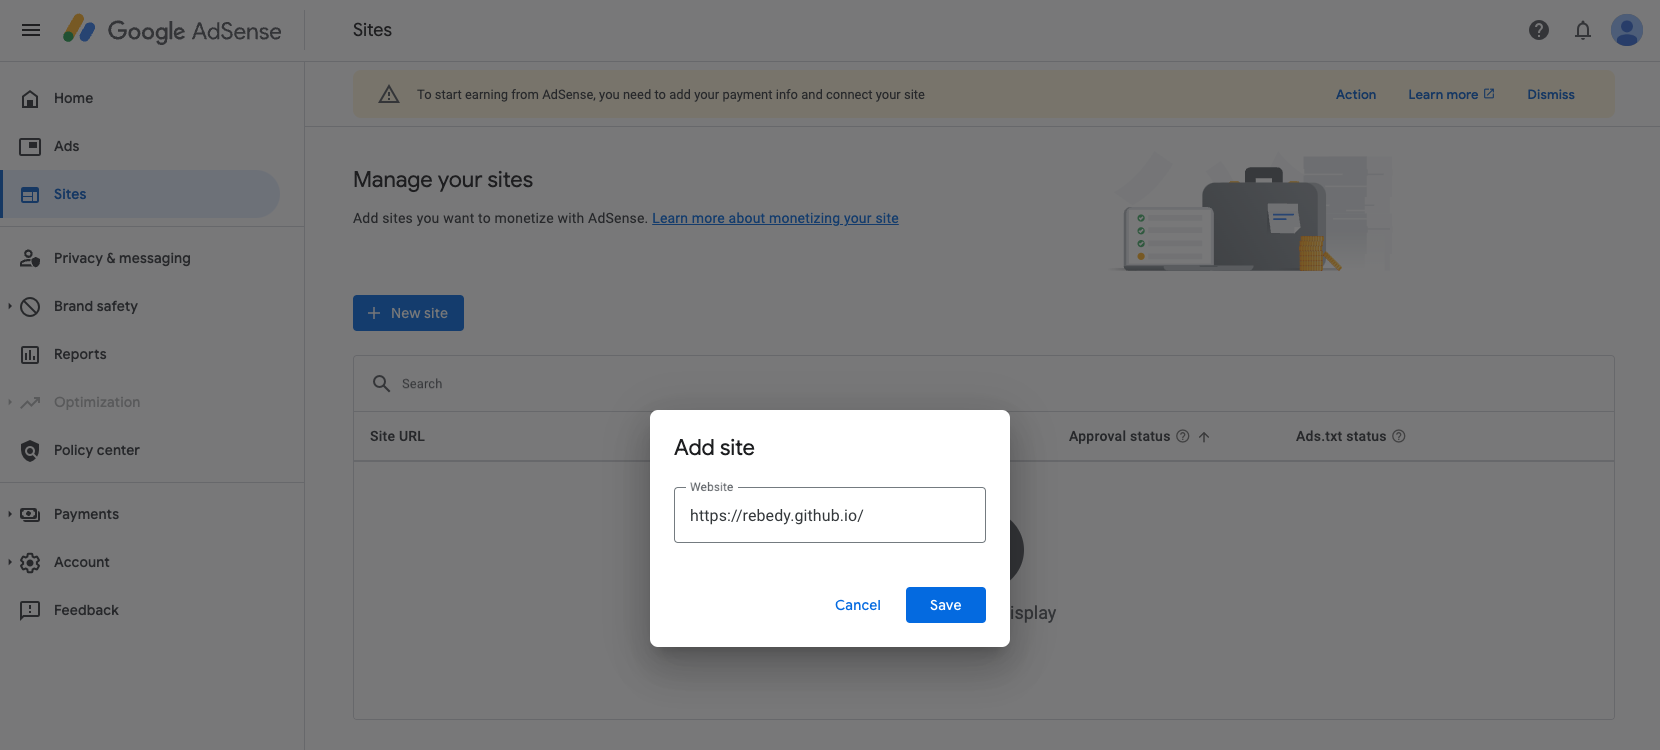
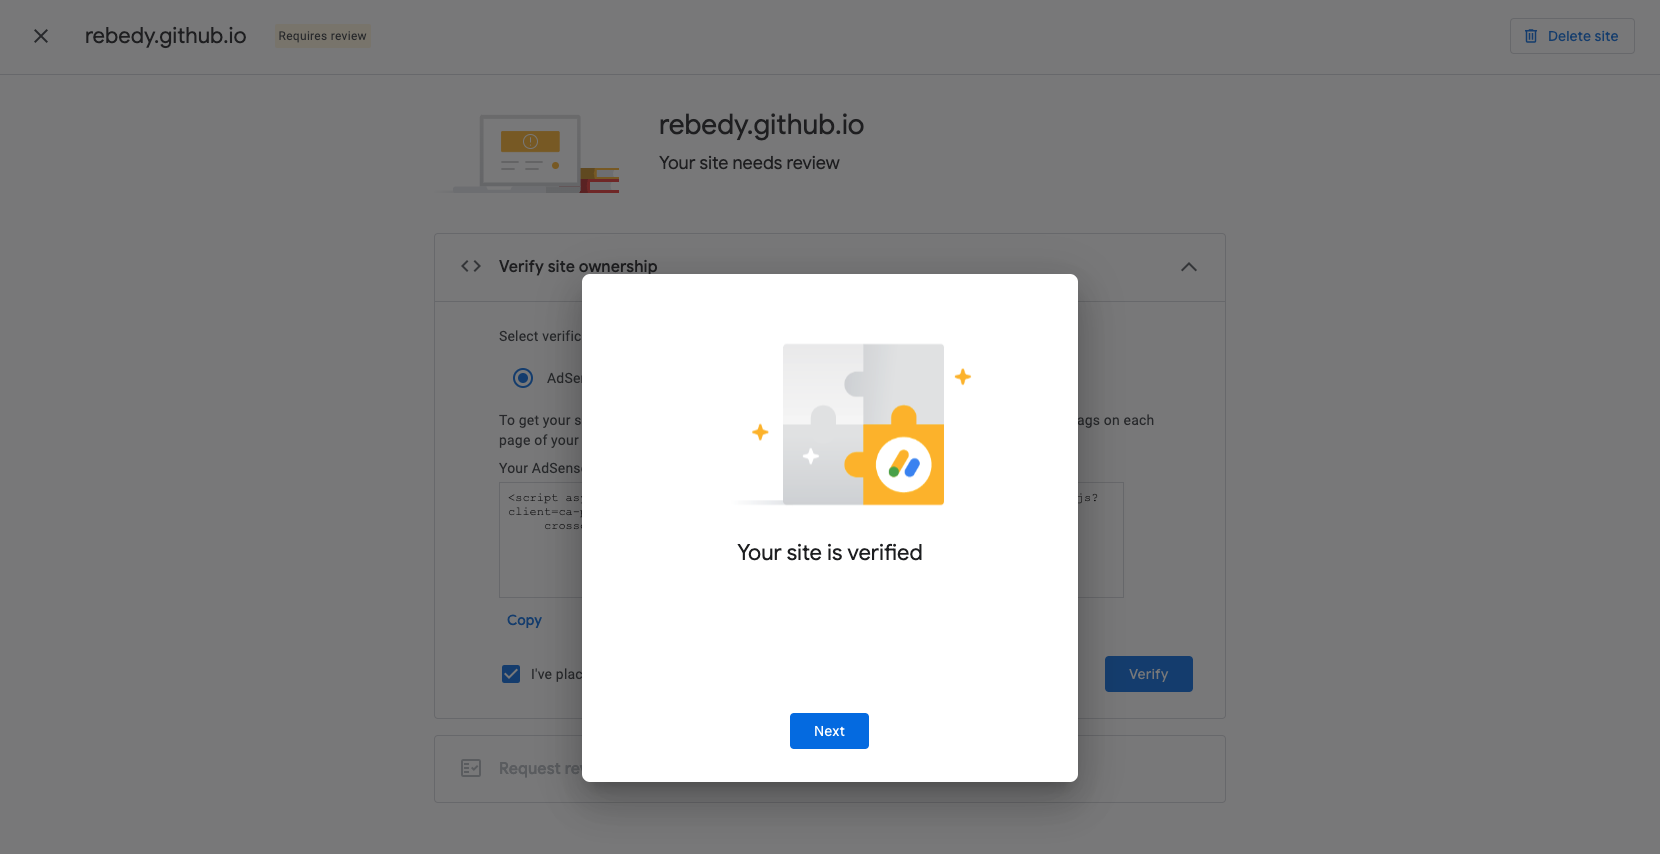
Then check “I’ve placed the code” then press Verify.
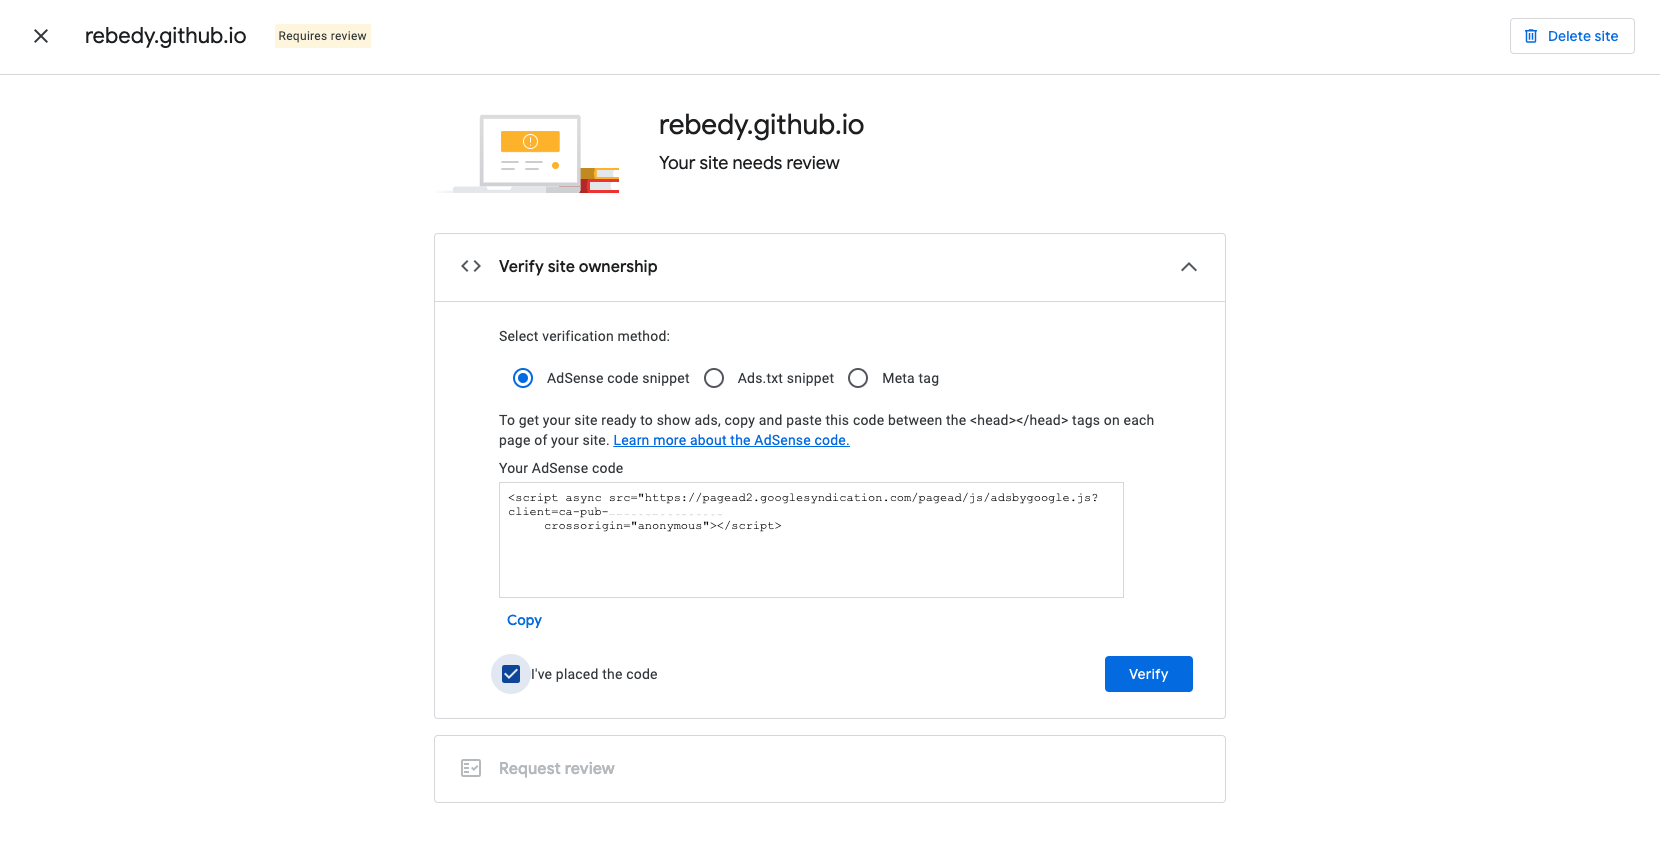
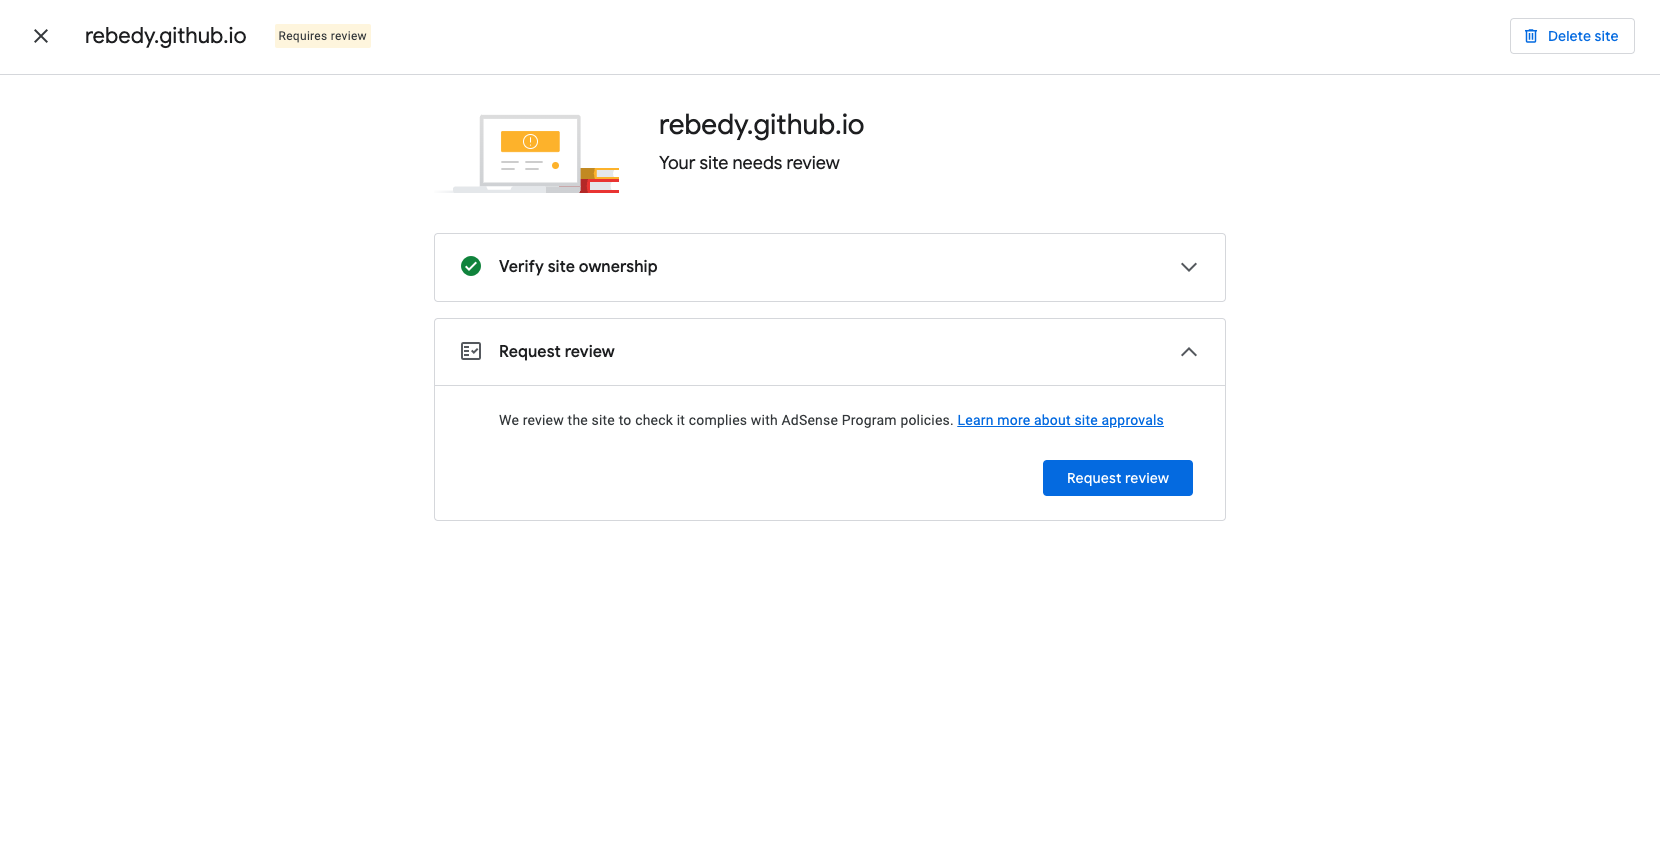
It will verify the site.
Request for review.
Step 4. Endless Waiting… and rejection
After inserting the
Now let’s wait for good results…
And~~~ the rejection!

Press Fix now.
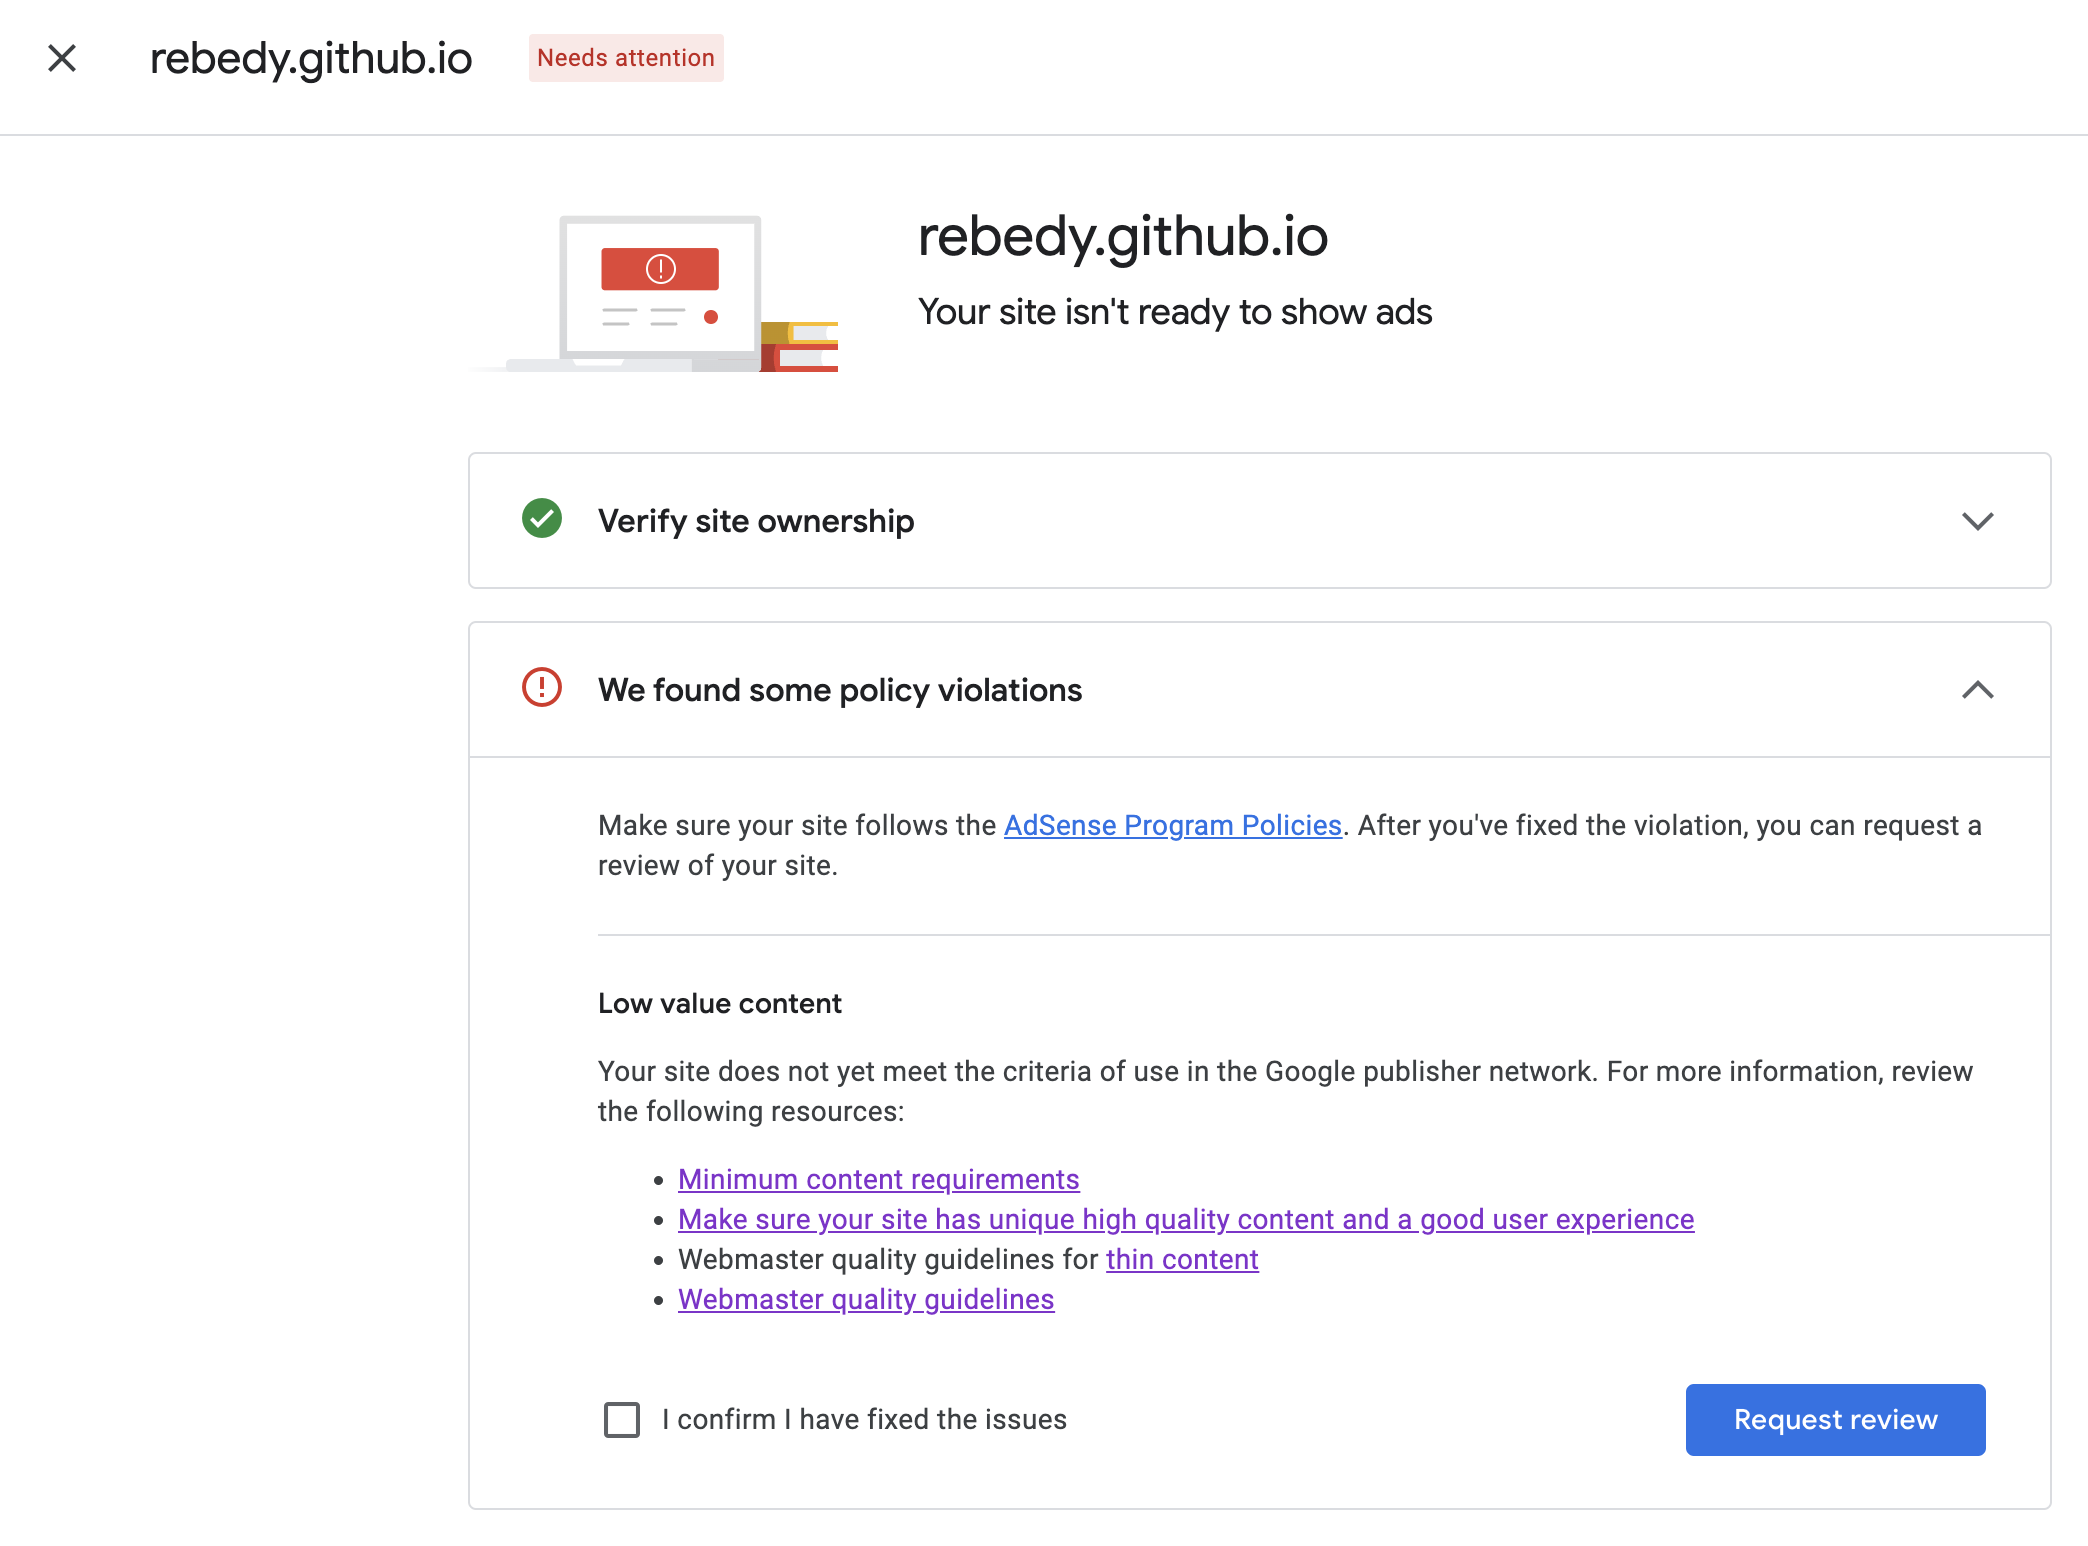
And check for the “I confirm I have fixed the issues” if you did something to improve your site. Then press Request review button.
Step 4. and more waiting…
Re-do the step 3 over and over again till it accepts your site.